Showing posts with label linux. Show all posts

Saturday, May 24, 2014

SSH Agent Forwarding


Scenario

  • - Password login is disabled on both the servers Node1 and Node2
  • - Your public key is added to both the servers Node1 and Node2 when they were created. (for example using OpenStack)
  • - Firewall rules only allow access to Node1


Question
- How to login to Node2

Solution: Enable agent forwarding


  •  Add your ssh private key to ssh forwarding agent

 ssh-add -c  ~/.ssh/your_private_key

  •  ssh to Node1 by enabling agent forwarding, like so:

 ssh user@Node1 -A

  •  Once you login to Node1, you can login again to Node2

 ssh user@Node2

  •  You can combine both steps into 1 command like so

 ssh user@Node1 -A -t ssh user@Node2


Tuesday, June 4, 2013

Reverse search bash command history

Ctrl + r => start reverse command search

Ctrl +r/s again  to move up and down the search list.

Example:

Suppose the command history contains the following command that start with "sudo"

10. sudo yum install gvim
......a bunch of other commands
20. sudo yum update -y
...other commands
30. sudo umount /mnt/disk1

Pressing "Ctrl+r" and typing "sudo" will find the last used command that matches "sudo" i.e line #30. To move up and down the list press "ctrl+r" and "ctrl+s"


Sunday, April 28, 2013

How to parse xml in python using etree

Like the previous example How to parse xml in python using minidom, let us use etree to parse xml this time. We will be doing the same 4 operations:

- Read the content of an xml tag
- Read attribute value
- Add a node
- Delete a node

And we will be using the same xml file named 'file.xml'

<?xml version="1.0" encoding="UTF-8" ?>
<menu>
  <food id="1">
    <name>Pesto Chicken Sandwich</name>
    <price>$7.50</price>
  </food>
  <food id="2">
    <name>Chipotle Chicken Pizza</name>
    <price>$12.00</price>
  </food>
  <food id="3">
    <name>Burrito</name>
    <price>$6.20</price>
  </food>
</menu>

Read the content of xml tag

from lxml import etree

doc = etree.parse('file.xml')
nodes = doc.findall('food/name')
for node in nodes:
    print node.text

Output:
Pesto Chicken Sandwich
Chipotle Chicken Pizza
Burrito

Read attribute value

from lxml import etree

doc = etree.parse('file.xml')
nodes = doc.findall('food')
for node in nodes:
    print node.attrib['id']

Output:
1
2
3

Add a node

from lxml import etree
from lxml.etree import SubElement

doc = etree.parse('file.xml')
nodes = doc.findall('food')
for node in nodes:
    rating = SubElement(node, 'rating', value='5')
    rating.text = 'Average'

ofile = open('newfile.xml','w')
ofile.write(etree.tostring(doc))
ofile.close()

This produces the following output
<?xml version="1.0" ?>
<menu>
  <food id="1">
    <name>Pesto Chicken Sandwich</name>
    <price>$7.50</price>
    <rating value="5">Average</rating>
   </food>
  <food id="2">
    <name>Chipotle Chicken Pizza</name>
    <price>$12.00</price>
    <rating value="5">Average</rating>
   </food>
  <food id="3">
    <name>Burrito</name>
    <price>$6.20</price>
    <rating value="5">Average</rating>
   </food>
</menu>

Delete a node
Let us delete all <rating> tags from the newfile.xml file.

from lxml import etree

doc = etree.parse('newfile.xml')
nodes = doc.findall('food/rating')
for node in nodes:
    parent = node.getparent()
    parent.remove(node)

doc.write('file.xml')

This produces the original file we started with!

Change byte ordering in bash shell - Convert from BGR to RGB format

Say for example BGR color code is BBGGRR; to convert it into RGB format in bash shell:

$ color="BBGGRR"
$ echo ${color:4:2}${color:2:2}${color:0:2}

The format is
${variable:index:length}

This thing could also be used to convert big-endian to little-endian formats.

Friday, April 26, 2013

How to parse xml in python using minidom

The most common things i find myself doing when working with xml files are the following.

- Read the content of an xml tag
- Read attribute value
- Add a node
- Delete a node

Lets see how to do this in python using minidom. For the purpose of this post, lets assume that the name of the file is "file.xml" with following content.

<?xml version="1.0" encoding="UTF-8" ?>
<menu>
  <food id="1">
    <name>Pesto Chicken Sandwich</name>
    <price>$7.50</price>
  </food>
  <food id="2">
    <name>Chipotle Chicken Pizza</name>
    <price>$12.00</price>
  </food>
  <food id="3">
    <name>Burrito</name>
    <price>$6.20</price>
  </food>
</menu>

Read the content of xml tag

from xml.dom import minidom

doc = minidom.parse('file.xml')
nodes = doc.getElementsByTagName('name')
for node in nodes:
    print node.firstChild.nodeValue

Output:
Pesto Chicken Sandwich
Chipotle Chicken Pizza
Burrito

Read attribute value

from xml.dom import minidom

doc = minidom.parse('file.xml')
nodes = doc.getElementsByTagName('food')
for node in nodes:
    if node.attributes.has_key('id'):
        print node.attributes['id'].value

Output:
1
2
3

Add a node
Lets add a <rating> node with default value 5 to each of the food item to know its popularity.

from xml.dom import minidom

doc = minidom.parse('file.xml')
nodes = doc.getElementsByTagName('food')
for node in nodes:
    rating = doc.createElement('rating')
    rating.setAttribute('value','5')
    text = doc.createTextNode('Average')
    rating.appendChild(text)
    node.appendChild(rating)

ofile = open('newfile.xml','w')
doc.writexml(ofile)
ofile.close()

Output: The resulting xml looks like:
<?xml version="1.0" ?>
<menu>
  <food id="1">
    <name>Pesto Chicken Sandwich</name>
    <price>$7.50</price>
    <rating value="5">Average</rating>
   </food>
  <food id="2">
    <name>Chipotle Chicken Pizza</name>
    <price>$12.00</price>
    <rating value="5">Average</rating>
   </food>
  <food id="3">
    <name>Burrito</name>
    <price>$6.20</price>
    <rating value="5">Average</rating>
   </food>
</menu>

Delete a node
Lets now delete the <rating> tag from the food item.

from xml.dom import minidom

doc = minidom.parse('file.xml')
nodes = doc.getElementsByTagName('rating')
for node in nodes:
    parent = node.parentNode
    parent.removeChild(node)

ofile = open('newfile.xml','w')
doc.writexml(ofile)
ofile.close()
             
This result is xml file similar to the one we started with.

Saturday, July 14, 2012

Batch rename files from lower case file name to upper case filename or vice versa!

Suppose you have a lot of image files in lower case name and you want to change rename them to upper case filename or vice-versa


for file in *.jpg; do mv $file $(echo $file | tr a-z A-Z); done

or from upper case to lower case

for file in *.JPG; do mv $file $(echo $file | tr A-Z a-z); done

If filenames contains spaces in them then just wrap the variable names in "", like

for file in *.jpg; do mv "$file" "$(echo $file | tr a-z A-Z)" ; done

Thursday, February 9, 2012

Yum cannot resolve $releasever - Fedora

Yesterday I was installing some packages with yum, but then later decided to cancel the install pressing Ctrl+C, after that i started noticing this issue. Whenever i tried to install anything yum spilled the following error.

Could not parse metalink http://mirrors.fedoraproject.org/metalink?repo=fedora-$releasever&arch=x86_64 error was
No repomd file

Yum was not able to resolve the value of $releasever variable. It turns out that it gets to know that value from the version of "fedora-release" package installed on the system.
After i figured that out, the solution was simple, just reinstall "fedora-release" for your current system. Since currently i am using fedora 15, I issued the following command

yum install fedora-release --releasever=15

Notice, you need to tell yum to use release version of the current fedora release using --releasever

Tuesday, November 1, 2011

What's the problem

No matter how much you think you know C/C++ there are things that you can always miss if you are not thorough. This small program is one of them. Can you tell me how many times "Java Rules" is printed ?
#include <stdio.h>

  int main()
  {
   int counter = -1;
   
   while( counter < sizeof(int))
   {
     printf("Java Rules!! \n");
     counter++;
   }
    
   return 0;
  }
The answer is none, because the fact is Java doesn't Rule :P
Alright alright, the reason is sizeof operator returns unsigned int :)

Saturday, September 3, 2011

Package management in Fedora (or RPM based systems)

The two tools/command used for package management in a RPM based system (like Fedora or Redhat) are:

a). rpm
 - Originally standing for "RedHat Package Manager"
 - Now a recursive acronym for "RPM Package Manager"
 - No pacakge dependencies resolution.

b). yum
 - It stands for "Yellodog Updater, Modified".
 - Re-write of existing tool called "Yellodog Updater (YUP), hence the name.
 - Supports package dependencies resolution.


1. Search for a package named "foobar"
    yum search foobar
    yum search all foobar

2. Install the development files for "foobar"
    yum install foobar-devel

3. Install documentation for "foobar"
    yum install foobar-doc

4. Check if package "foobar" is installed
    rpm -q foobar

5. List all the files installed by package "foobar"
    rpm -ql foobar
    rpm -q foobar | xargs rpm -ql

6. If you have a file say "/etc/foobar.conf" and want to know which package does it belongs to
    rpm -qf /etc/foobar.conf

Sunday, February 27, 2011

SSH Tunneling to overcome Firewall rules.....

A Typical network scenario in an Organisation
So, what is SSH Tunneling ?
When one network protocol(delivery protocol) encapsulates another protocol over itself, it's called Tunneling (Wikipedia)
And when the delivery protocol is SSH its called SSH Tunneling. Simple !!

Usage Scenario
Consider a typical scenario as shown above.
We have a web server called Atlantis and a SSH server called Endeavour.
For some reason(company policy ??) users are allowed access only to SSH server and not to the webserver. What if a user wants to access the webserver ?? Without tunneling he cannot access the webserver because port 80 is blocked by the firewall rules; so what's next ?

SSH tunneling can come to rescue in such situations.
We can Tunnel HTTP protocol (web server) over SSH protocol. So, how do we do it ?
Connect to SSH server as:

$ ssh Endeavour -L8080:Atlantis:80
$ ssh [ssh server] -L[local port]:[remote machine]:[port on remote machine]


The only thing to keep in mind is that the remote machine must be accessible by your ssh server. What this does is, it opens a local port 8080 and forwards all the traffic on that port to Atlantis on port 80 through your SSH server. The SSH server acts as the relay between your machine and the webserver.

To access the webserver, just point your browser to http://localhost:8080

Other Advantages
Since SSH is a secure protocol, meaning all the communication between your machine and the server is encrypted; it helps to transfer unencrypted traffic(http) over the network through secure channel(ssh).

Sunday, February 20, 2011

Transform Linux to Mac OS X

Before I proceed, let me first state that i LOVE the simplicity of my Linux desktop (Gnome to be precise). I am writing this post just to demonstrate that how easy it is to make your Linux desktop look like a Mac ☺

The two things that are characteristic of Mac are :
1. It's Dock at the bottom.
2. Global menu bar at the top.

There are many projects (like cairo dock, avant window navigator etc) out there that provide Mac like Dock for Linux. But the one that i find more useful and easy to configure is Docky. To find a list of dock applications go to http://en.wikipedia.org/wiki/List_of_dock_applications.

Since i am using Fedora, the details will be specific to it, but it would be somewhat similar in other distros as well.
Before we start, lets see how the default desktop looks like in fedora 14.

Default Desktop in Fedora 14


Let's get started

1. Installing the Dock
Fedora uses yum as the package manager. So to install docky, open a terminal and execute
$ yum install docky

2. Installing Global Menu
Open up a terminal and execute
$ yum install gnome-applet-globalmenu

Post Install configuration
Delete bottom panel
At this point there will be no visible changes, because our installed programs are not running. We need to get rid of the bottom panel. To do this right click on empty space on the bottom panel to bring the context menu and click on "Delete This Panel". Similarly delete the custom menu bar in the top left corner.


Add to Panel
The next step is to add the main GNOME menu. This is similar to custom menu bar but does not have "Application", "Place" and "System" as shown in the custom menu bar. To do this right click on empty space on the top panel and click on "Add to Panel".


Add Global Menu to Top Panel
Similarly add Global menu to the top panel. If you cannot find this item, try logging out and login back.


Enable Docky from StartUp applications list.

The next step is to enable Docky from startup applications list. To do that execute $ gnome-session-properties from a terminal and select Docky from the list.


Change the wallpaper if you like. I have also installed gnome-color-icon theme. It provides different colored icon themes; i have selected purple one. To install, open a terminal and execute $ yum install gnome-colors-icon-theme

Log-off and login again. Here is the final desktop look.

Pseudo Mac


----- Insanity is hereditary, you get it from your kids :) -----

Thursday, February 17, 2011

Password free login to SSH using public keys

Many of us at some point in time have faced this situation of working remotely on a Unix/Linux box. The most preferred way is through SSH. But every time you login to a machine remotely you have to provide your password. How about logging in without password; using public keys ???☺

To demonstrate this method, I will be using 2 Linux machines.
1. Caffeine: This will act as ssh server.
2. Coffee: This machine will act as client.

Server Side Settings (Caffeine)
On the server we need to start the ssh daemon.  $ sudo /etc/init.d/sshd start

Start the SSH server
That's all we need to do on the server side !!

Client Side Settings (Coffee)
In order to login without password, first you need to create public-private key pairs.
In order to do this on linux (fedora or ubuntu ) execute   $ ssh-keygen

Create public-private key pair
Just hit and accept the default file name. Enter the pass-phrase or hit enter for none.
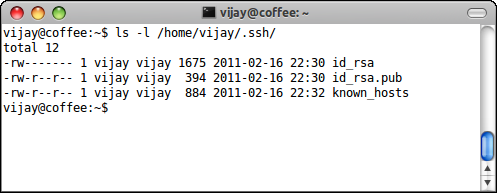
This step would have created 2 files as shown below in your  ~/.ssh folder.

Public/Private key files
Of the two files, id_rsa contains the private key and id_rsa.pub contains the public key.
After we have the public and private key files, we need to add these keys to the authenticating agent. Its the authentication agent who performs the authentication on our behalf. To add the keys execute $ ssh-add
If you have provided the password in the above step, it will ask for a password

ssh-add, keys with password
else it will not

ssh-add, keys without password
The next step is to copy and paste the public key from id_rsa.pub into Server's (Caffeine)   ~/.ssh/authorized_keys file on a new line. This step needs to be done once, either manually or by executing    $ ssh-copy-id user@machine. You will be prompted for your password.

** Important: The file permission for   ~/.ssh/authorized_keys must be 400, else it will not work. **

ssh-copy-id
Testing !!
That's all that is needed. You can now try to login to the server without passwords.
To login just type  $ ssh user@machine or like most of the cases if the user-name is same on both machines then just $ ssh machine

Login with user and machine names


If the username is same, just use machine name
----- I tried so hard and got so far, but in the end it doesn't even matter -----

Tuesday, June 23, 2009

Official F*ck count of the linux 2.6.30 kernel

Yesterday I downloaded and compiled the 2.6.30 linux kernel source from http://kernel.org/. After booting from the newly compiled kernel I thought of counting the "Official Fuck Count" of the 2.6.30 kernel.

Here's the result:

[vijaush@pheonix linux-2.6.30]$ find . -exec grep -i fuck {} \; -print
* (And this is the fucking 'basic' method).
./net/ipv4/netfilter/nf_nat_snmp_basic.c
/* Fuck, we are miserable poor guys... */
./net/core/skbuff.c
/* If you fuck with this, update ret_from_syscall code too. */ \
./arch/sparc/include/asm/system_64.h
/* XXX Fucking Cypress... */
./arch/sparc/kernel/head_32.S
/* Some BIOS's are fucked and don't set all MTRRs the same! */
./arch/x86/kernel/cpu/mtrr/generic.c
* Some Athlon laptops have really fucked PST tables.
./arch/x86/kernel/cpu/cpufreq/powernow-k7.c
* fucking with the memory controller because it needs to know the
./arch/mips/sgi-ip22/ip22-setup.c
* IOC3 is fucked fucked beyond believe ... Don't even give the
* IOC3 is fucked fucked beyond believe ... Don't try to access
* IOC3 is fucked fucked beyond believe ... Don't even give the
* IOC3 is fucked fucked beyond believe ... Don't try to access
* IOC3 is fucked fucked beyond believe ... Don't even give the
* IOC3 is fucked fucked beyond believe ... Don't try to access
* IOC3 is fucked fucked beyond believe ... Don't even give the
* IOC3 is fucked fucked beyond believe ... Don't try to access
./arch/mips/pci/ops-bridge.c
/* master list of VME vectors -- don't fuck with this */
./arch/m68k/include/asm/sun3ints.h
/* Fucking broken ABI */
./arch/parisc/kernel/sys_parisc.c
* What the fuck is going on here? We leave junk in the beginning
./sound/oss/opl3.c
case XFS_BTNUM_MAX: ASSERT(0); /* fucking gcc */ ; break; \
./fs/xfs/xfs_btree.h
/* Only Sun can take such nice parts and fuck up the programming interface
/* This card is _fucking_ hot... */
./drivers/net/sunhme.c
* These chips are basically fucked by design, and getting this driver
./drivers/ide/cmd640.c
registered, to prevent the link/init ordering from fucking
./drivers/mtd/mtd_blkdevs.c
* brain-damage, it's managed to fuck things up one step further..
./drivers/watchdog/shwdt.c
/* Am I fucking pedantic or what? */
./drivers/scsi/qlogicpti.h
BUG? Why does turning the chroma comb on fuck up color?
./drivers/media/video/bt819.c
* Wirzenius wrote this portably, Torvalds fucked it up :-)
./lib/vsprintf.c
[vijaush@pheonix linux-2.6.30]$


That's total of 32 count in 19 files.


Also have a look at this site http://www.vidarholen.net/contents/wordcount/. It has a graph of all the swear words used in the linux kernel.

Monday, June 22, 2009

Logging into Fedora 11 as the root user

Today i tried to log into my system as the 'root' user and GDM will not allow me to log into the system. Looks like that GDM does not allow root user to log into the GUI mode.

To overcome this limitation, you can edit the /etc/pam.d/gdm-password file and comment the line saying:

auth required pam_succeed_if.so user != root quiet


That's it, restart the GDM and login as 'root' user.

Thursday, April 9, 2009

Change return address on stack through buffer overflow (Linux)

Ok, i know that i am late; and i should have written this way long before; but anyways, better late than never :)

As said in the previous post, i am going too tell something about changing the return address on the stack through buffer overflow. Please keep in mind that it is not very fancy; its just for the beginners; i am still learning ;)

So, the code goes as:

#include<stdio.h>
#include<stdlib.h>
#include<string.h>

void bar()
{
printf("\n\nAey,\nWhat's up doc :) \n\n");
exit(10) ;
}

int foo(char *input)
{
char buffer[14];
strcpy(buffer,input);
}

int main()

{
//print some useful information
printf("main=%p\n",main);
printf("foo=%p\n",foo);
printf("bar=%p\n",bar);

foo("ABCDEFGHIJKLMNOPQR\x24\x84\x04\x08");
return 0;

}


This code is written on a linux machine, the same will not work on windows machines. It turns out that C compiler on windows places some more information on the stack after the stack frame pointer.


Code explanation:
Here, we have three function; the good old main() our entry point to the application; then we have the foo() function and the bar() function.

In the main() we are just printing the addresses of the functions in the memory; and then there is a call to the foo() function. Please note that the bar() function is never called; it is not in the control flow of the program. My aim was to somehow replace the address on the stack so that the bar() function is called automatically, when the foo() function returns.

The core of the logic ( if you say so :) ) is in the foo() function. Note the strcpy() operation; we are copying more data in the less space; hence it results in a buffer overflow. This overflowed data is then spilt over other information on the stack including the return address on the stack.

At this point when foo() function is executing, the stack looks something like this:


HIGH ADDRESS LOW ADDRESS
-------------------------------------------------------------------------------------------
input | return address (4 bytes) | sfp (4 bytes) | buffer (14 bytes) |
-------------------------------------------------------------------------------------------
Stack grows this way ------->


From the figure above we can easily see that the return address is at an offset of 18 bytes from the buffer; 14 bytes for the buffer and 4 bytes for the stack frame pointer. So if we copy more then 14 bytes in buffer we will overwrite the stack frame pointer and if we copy more than 18 bytes into the buffer we can easily overwrite the return address on the stack, and there is on one who will stop you from doing this :)

The next question is how to write the return address?
As this code is written on intel machine which is a "little endian" machine; you write the little end of the address first and then the higher end of the address. Say for example, if the address is 0x08048454 the string representation of the same will be \x54\x84\x04\x08. We start with the little end of the address.

If you compile this code on your machine, the address of the bar() function will be different on your system, so just change the return address in the string that is passed to the foo() function as told above and you are ready to go.

Please note that Linux now provides what is called Address Space Randomization. This means that each time your application is loaded into the memory, it is loaded at some random address. This will change the address of the functions every time they are executed. This in turn will render this address changing on the stack useless. To overcome this turn off Address Space Randomization in Linux as follows:

$ echo 0 > /proc/sys/kernel/randomize_va_space

This will make sure that the functions are loaded at the same virtual address every time.

Wednesday, March 25, 2009

Stack and Assembly

Its long time, I've written something here. Actually was busy with my project, which finally completed yesterday. So for some time now I am kinda free; I am trying to utilize this time to do something useful and something that I've always wanted; that is to learn "Assembly language". I particularly like the tricks with the stacks and the small and smart tricks that can be done with the Assembly language.

So, keeping this thing in mind I have started out with Assembly. As of now I have set 2 tasks for myself:

1. To change the return address on the stack.(should be easy one :) )
2. To execute a shellcode and spawn a shell.

Lets see, how does it goes. If I succeed in doing these, then maybe I will post a small howto of the same.

Thursday, February 26, 2009

KDM Login

I finally successfully installed both Windows XP and Fedora 10 (Both KDE and GNOME) on my acer aspire whose pre-installed OS (Linpus Linux) had been screwed by me earlier. Windows fonts were fine for the small screen, but i had to manually change the default fonts both in KDE and GNOME. The default fonts were too large for the small screen of aspire one. What took me more time figuring out was the font size of KDM login screen. After much going about the filesystem, i fixed it today.
It goes as follows; the file /etc/kde/kdm/kdmrc is the configuration file for the KDM. In this file under the [X-*-Greeter] section there is a Theme option that points to the folder containing the currently used KDM theme. After this all that needs to be done was to edit the xml configuration file.

Thursday, January 15, 2009

Fedora 10 - Fire it up


I was thinking of doing it since long, and finally I did it today. Yes !!! today i moved on from Fedora 7 to Fedora 10. I also have used Fedora 9 but it didn't impressed me much, so I switched back to using Fedora 7. This release of Fedora is what Fedora core 6, for the previous versions of Fedora.

This release has a lot of improvements and a loads of eye candy. I specially liked the rhgb replacement called Plymouth. I loved the "Solar" plymouth plugin. It took me some work to get the Solar theme working, but the work was worth it :)

For those of you who are still trying to get the Plymouth theme working, here it goes. Open /etc/grub.conf in your favorite text editor and add the line vga=ask at the end of the "kernel" line, and save the file and reboot the system. When Fedora boots, it will show the possible VGA resolutions for your monitor. Select the resolution that best fits your monitor, and remember the code. After logging in the system, again edit the /etc/grub.conf file and replace vga=ask with the code you selected preceded by 0x. For example vga=0x31b

Monday, January 12, 2009

Installing Linux/Fedora 10 on a Windows machine without CD

Have you ever faced a condition where you have to install Linux on a machine that is running windows and it doesn’t have a cdrom drive or there is no Linux installation CD available. Well there is another installation method that can be used to boot Linux installation program on windows machine and install Linux over the network.

Procurements:
The first step is to download grub loader for windows. It can be downloaded from any of the grub4dos project sites like http://sourceforge.net/projects/grub4dos
Now from the downloaded archive extract the file named “grldr”. It is the grub loader file, and the file menu.lst. This is the menu options file. This completes the first step of the process.

The second step is to get the location of the site that hosts the Linux distribution that you want to install. For example you can get the Fedora 10 installation files hosted here: ftp://ftp.jaist.ac.jp/pub/Linux/Fedora/releases/10/Fedora/i386/os/
Now download the file “vmlinuz” and “initrd.img” from here. These files can be found in the “isolinux” folder.

After the above two steps you have:
1.The Grub loader (grldr)
2.The menu.lst file
3.vmlinuz file
4.initrd.img file.

These are all the bare essentials that you need to boot the Linux installation program and install Linux on your system. Place all these file in the root drive of your windows installation, normally its C drive [c:]

Configuration:
Edit your menu.lst file. Delete entire content from the file, and add the following text to it.

~~~~~~~~~ menu.lst ~~~~~~~~~~~~~~
timout=10
title Linux/Fedora Installation
kernel /vmlinuz
initrd /initrd.img
~~~~~~~~~~~~~~~~~~~~~~~~~~~~~~~
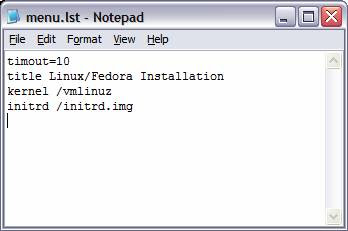


You menu.lst file should have this content only. Well it can have other setting, but all that are not necessary for the installation purpose. This is the lean mean configuration :)

The next step is to edit the windows boot.ini file. This file is normally c:\boot.ini, but it has its attribute as System, Hidden and Read-Only. If you can find the file, it’s well and good else to change the attributes open the windows command prompt and execute the following command:

attrib –s –h –r c:\boot.ini

After this step you can see the file boot.ini in your c:\ drive.
Now you need to edit this file. Open boot.ini in notepad, and append the following lines at the end of the file

c:\grldr=”Fedora Installation”
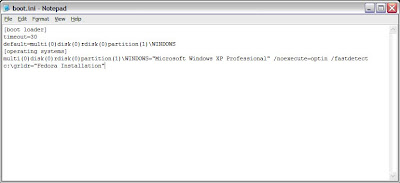


That’s it !!! All configuration completed.

What’s next ???
Nothing much, you just need to reboot your windows machine. But before rebooting please check that:
1.You have placed “grldr”,”vmlinuz”,”initrd.img” and “menu.lst” file in your root drive, mostly that’s gonna be c:\
2.You have edited your “menu.lst” file
3.You have edited your “boot.ini” file.

After these checklists, REBOOT.


After Reboot:
When your machine boots again, it will present you with a boot menu that says “Fedora Installation”. Select this option form the menu and hit enter. After this, you will be presented with a grub menu that says “Linux/Fedora Installation”. Select that option and again hit enter, and Viola !!!! You have booted the Linux Installation program.

Post steps:
Select the keyboard layout and the default language from the options that are presented. When the program asks for the installation media, select “URL” option and provide the URL from where you want to install your Linux distribution. Please note that this location has to be the same from where you have downloaded the “vmlinuz” and “initrd.img” files. In our case it will be ftp://ftp.jaist.ac.jp/pub/Linux/Fedora/releases/10/Fedora/i386/os/

It is also a good idea to set up your own ftp server, with the files extracted from the Fedora iso image, and provide its path here. This is a good idea if you do not have good internet connection, like mine :)

Hit enter and continue with the installation!!!

Saturday, November 29, 2008

How to increase SWAP space in linux

Adding more swap space is very easy in Linux, all you need to have is some free hard disk space. Say for some weird reason you need to increase your swap space by say 500MB, then this is how you can go about adding it.

Firstly, create a file of 500MB using 'dd'
dd if=/dev/zero of=/home/swapfile bs=1k count=500000
then set appropriate permissions for the file
chmod 600 swapfile
make it a swap file
mkswap swapfile
and finally activate it
swapon swapfile
That's it, you have just added 500MB of swap space. You can check the swap size using the 'free' command. In future if you want to remove the swap space, then do the following

turn swap off
swapoff swapfile
delete the file
rm swapfile


That's it.